We’re joined again by GhostlyRoaster in Part II of our discussion on home roasting machines. In this episode, we discuss DIY, or homemade roasting machines. We discuss the hows and the whys of building your own home coffee roaster.
Highlights & Takeaways
Building your own home roaster is for those looking to customize and/or expand on what is offered in the market.
What we mentioned on during this show
Episode 35 Transcript
Brendan: Nice Kyle. You got time to talk about options for DIY home roasters?
Kyle: Sure, absolutely. Let’s talk.
Brendan: Cool. Well, you know what I’ll be probably do, I’ll probably split that, the second part of this discussion up into a second show. If you got time, let’s go ahead and get into it. The DIY home roaster, this is basically a build-it-yourself, kind of do-it-yourself, you want complete control over the entire system and what it’s doing. This is what you’ve done, correct?
Brendan: This is what you’ve done, correct?
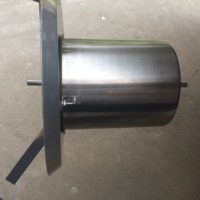
Kyle: Yes. I really wanted a drum roaster. I actually started out with the one that I kind of didn’t talk about is where I got started with my drum roasting. It was on a Baby George Foreman rotisserie. I bought a drum that was specifically made for that device. Great product. Great craftsmanship, but it just wasn’t for me. I wanted more. I wanted to use what I already had in place which was that drum. I already bought it. It was $90.
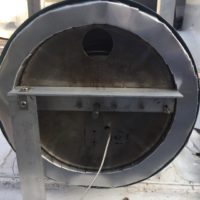
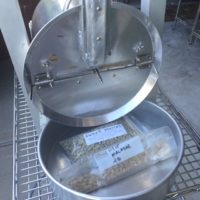
I came up with this plan to make my own drum roaster, which — What is it? Eight months, about a year ago, roughly. I actually came up with a design and sat on it for eight months. I did it in a year. I sat on it for eight months and I finally pulled the trigger on it. I’ve been building it for about five months. What I did was I started out with that drum. I went and bought a $2.50 stainless steel pot at a garage sale, and went to my local restaurant supply. I bought a deep-dish pizza pan for the cooling tray. I bought a thin, I guess a thin piece of plate, if you will, all aluminum and used it for my face plate for my roaster and did a whole bunch of fabrication.
I actually made my own home roaster, which the first version needed a lot of work. [laughs] It did. You know, you got it in your head, everything’s going to line up to the millimeter and everything. You don’t have a mike, you just have an old beat up ruler. You do your best and it worked good for a while. I ended up making another version of it, but yes, just pulling those pieces together with also a heat gun. My heat source is a heat gun as well.
Brendan: Okay. So, to kind of back track a little bit. We’ve talked about all the prepackaged or out of the box solutions, the easy setup, and just start roasting. Why build your own roaster?
Kyle: I think you hit the nail on the head there. You just want to do it yourself. You like building things with your own hands. It does give you a lot of personal fulfillment. Plus, you can tweak it the way you want it. For me, and I think for a lot of people, especially a lot of your viewers who probably brew beer, obviously, like to tinker and make their own little devices.
Brendan: Yes. I meet more home brewers that are engineers than are not. [laugh] Some of the things that they put together and build, and make, it’s absolutely incredible. I get it. I just wanted to put that out there for the audience who’s listening.
Kyle: The funny thing is, I can’t drink beer anymore, but I used to brew beer as well. I’ve got a Corny keg and a regulator, CO2 regulator, and I’ve got the two Carboys and all that. It lends itself to coffee and building your own roaster when you’re in that whole realm of DIY.
Brendan: Sure, you’ve got all that stuff. We’re going to have set you up with a nitrogen tank and get you serving your cold brew on tap.
Kyle: I did. When we started talking about this, we’re going off on a little tangent here, I wasn’t the biggest fan of cold brew. Not that I didn’t like it, but my palate doesn’t hit me well, at least at this point. The other day, I roasted up the last of some India tree dried coffee. I don’t know the whole name, but I’ve had it sitting on hops for quite a while, and they’ve been off hops for about four months because I do like to dry hop my coffee.
I roast them and then I did a cold brew and I used your recipe. It turned out great. What was nice about it is that just that day, I happened to have to get up really early in the morning. I probably did 20 hours just because getting it done before work, the day before, and I took cold brew or ambient brew — yes, that’s a whole other thing.
Brendan: It is.
Kyle: Yes. So, I took that and just put it in the fridge, and then I heated it up in the microwave and it was wonderful. It really was delicious.
Brendan: I learned a lot just talking with Heather and Todd from Klatch Coffee on the last episode because they brought to my attention that, “All right, we’re a roasting company. We’ve been in business for 23 years, but here we are, we’re creating nine different cold brews in order to find the best one.” They’re trying all different types of beans. I’m assuming all different roast levels as well, and they went through the process that way. It’s safe to say that not every cold brew is going to be good. You might just use the wrong bean one time or the wrong roast and it could taste terrible. It’s definitely something that’s fun and you can do a ton of experimenting with.
Kyle: Yes. It’s great. Definitely, it’ll be in my wheelhouse moving forward and you just have to get your palate in the right spot and everything has its place.
Brendan: Absolutely. All right, so to bring this back into a build it yourself, DIY home roaster. You’ve mentioned a few of the parts that you got. Let me ask you this, is there a site out there that focuses on DIY roaster and just sells parts specifically for the people who want to build their own roasting machine at home, or are you sourcing parts from all over the internet constantly?
Kyle: All over the Internet. I’ll tell you. I can give you an example right now. This evening, right before we got on, I just had delivered to me my borosilicate 2-inch diameter by 3/8-inch-thick site glass, which I’ve been needing really bad because I don’t have a trier. I’m going to tell you what, a trier is the hardest thing to find. You think it’d be easy to Google anything nowadays. I can’t find one single place that I can buy a trier. It’s ridiculous.
Brendan: Interesting.
Kyle: But to get back to the point, no. Not that I have found, Brendan. You just have to source everything from everywhere. I think a good place to go would be the coffee farms. That’s actually —
Brendan: Those guys probably try everything. I imagine they’re like home brew farms.
Kyle: [laughs] Yes, they are. It’s funny that I found a link to a place and then ended up buying this site glass because I found a link through the farm. It worked out great. All them guys on the farm, they build all their own stuff and they’ve got some really fancy things, for sure.
Brendan: Yes, I bet. It’s like any hobby. You can just touch the surface, or you can dive down that rabbit hole and just open your wallet and keep going.
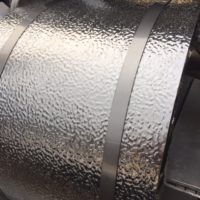
Kyle: I’ve sourced everything from 9-inch pipe insulation, wool, fiberglass insulation, which I wrapped last weekend I think, on a roaster, and used some aluminum jacketing with stainless steel banding. The heat gun, just a regular heat gun, just really from all over the place.
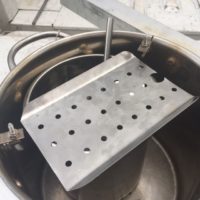
Like l said before, the restaurant supply is a great place to go, great place to go to get stuff. For my paddle, I used stainless steel like steam table. It’s not a tray, but it’s a piece that goes in a steam table, I think, has some holes in it, and it’s bent on the ends and it’s a great little scoop for my agitator. Works great, but I don’t know the place to go to say, “Here you go. Pick these parts and here’s some drawings and go for it.”
Brendan: Start building.
Kyle: Start building, yes.
[laughter]
Brendan: So. you got a little bit of a scavenger hunt and a DIY part.
Kyle: It is. It is a definite scavenger hunt, especially for that trier. Somebody’s probably going to reach out and go, “Here’s where you get the trier now, after a year.”
Brendan: I might put a website up for you, buyatrier.com
Kyle: There you go. I’d get one. It’s funny, but at the restaurant supply, no joke. This is no joke. Big huge, and all you chefs out there are going to love this, big mash potato masher.
Right? Just to wire that’s running back and forth, but the end of the handle is about three quarters inch in diameter by about four inches long stainless-steel. So, we’re going to buy a $10 potato masher for the trier, and put wood on it, and cut the end out. It’s ridiculous to think to go through your head.
Brendan: Yes, I bet. So, getting back to your build, let’s talk about the drum for a minute. I see in the notes that you had a rotating drum, but then you ended up doing a fixed drum with a rotating agitator. What are the options in terms of to hold the beans while you’re roasting, the drums, are there other options?
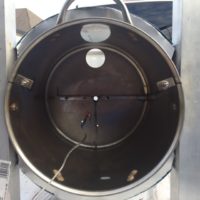
Kyle: Yes. I am limited by my outer vessel, because my outer vessel is about — actually, its nine-and-a-half-inches, nine-and-a-half-inches in diameter. So, to find something that would be the perfect size was hard for me and that is something that is a stainless-vessel that’s five inches in diameter, and has the right depth because I wanted the area around or inside the vessel for air to circulate, etcetera.
So, you get a kind of aluminum or stainless-steel, but I settled on — I don’t know the right name of it. Like a utensil holder, if you will, stainless steel. It’s either a utensil holder or a soup container. I can’t remember. It’s perfect. It’s stainless-steel, the edges are rolled over, and it was about five inches in diameter. It was not the same size as my other drum, but a little bit deeper. That stainless-steel, [unintelligible 00:42:15] did a great video here recently about heat transfer and the stainless-steel works really well for my inner drum.
Brendan: Okay, so explain to me and probably some of the others listening who aren’t familiar with roasting coffee, you mentioned inner and outer. What’s between them if anything or is that where the heat is applied or is there insulation in there?
Kyle: Yes, so it’s a circle in a circle if we are looking at the front view and we’ve got five-inch diameter pot and then a nine-and-a-half-inch diameter pot. It’s a couple of inches all the way around. Two, five, seven, there we go. My math is right.
So, in the back of the roaster, I have an inch-and-a-half hole where the blower blows into. That wasn’t my original design. My original design was to have two actually hot air poppers on the bottom and it would blow up, circulate around the drum and have a good circulation, but it just didn’t work out that way. So, I just put it in the back, popped a hole in it, put the heat gun on it, and went forward.
Now, in my drum though, my inner drum, I do have an inch and a half hole on the top and the back, and that’s where the heat comes in. It doesn’t dump directly into or blow directly into the inner drum, it does make its way there because the vessel pressurizes and pushes air through the drum. I have a stack on the front face plate that comes out.
Brendan: Okay. So, it kind of surrounds it?
Kyle: Yes.
Brendan: As well as goes through it?
Kyle: Yes, absolutely.
Brendan: All right, cool. In comparison to some of the off the shelf things, the air poppers, what are we talking about like total investment for building your own roaster.
Kyle: Right now, I’m in for about $450 roughly.
Brendan: Okay. You’re almost as deeply in as you would if you bought the Gene café, but you’ve got a lot more pride in your system than I have in mine.
[laughter]
Kyle: That includes everything from the drum, heat gun, stainless steel screws and bolts, and my temperature sensor. I have a Leaton L812 which can read type k amongst other type of thermal couples. It actually has a dual read-out. It’s $22. Cordless drill motor from a drive. We didn’t talk about it. I’ve got an angled cordless drill motor that has set up with stainless steel bands. It’s a hodgepodge. It’s crazy.
Brendan: We’re going to have to get you to take a short video of this thing, some pictures of the whole thing, and we’ll put those up on the show so people can check it out.
Kyle: I’d be glad to.
Brendan: Yes, I think that would be cool. I think a lot of the DIYers who listen will be definitely intrigued.
Kyle: Yes, there are a lot of good people out there building great products. I had to be a part of that.
Brendan: Yes, build your own Frankenstein right?
Kyle: It’s what it is, exactly. Yes.
Brendan: One of the questions I had asked you just because I used this roaster on one of our previous episodes. I considered it almost automated because it was just kind of set it and forget it. So, with the home roaster, is that possible? Is it possible to get to that point?
Kyle: Absolutely. It’s analogous to home brewing and people putting PID loops on their boiler kettles. You could do the same thing. You could put a PID on your heating elements, your blower motor, your motor for your drum, for your agitator, so there’s three things right there.
Brendan: You can monitor as many temperatures as you want.
Kyle: Absolutely. I ordered three. I have one for bean mass temp right now, but I do have some extras I was going to do. If I wanted to drop another $600 into it, then I’m going to do outside of temp humidity, drum speed, exhaust temperature, temperature inside the vessel, all these things. That’s really going down the rabbit hole there. It’s fun to talk about it. You definitely can do it, absolutely. People do it.
Brendan: That’s probably where you can really get into a consistent roast when you’re measuring all those things and you’re learning how to adjust on the fly if necessary, if your temperature gets too hot, or your humidity is too high or low. Just having all that data, I think in my opinion, where you can find a lot of consistency.
Kyle: Yes, absolutely. At that point, you probably have a nice control panel that you can tweak on and see things. That’s what I’d like. I do automation for a living and it’s just great to see all the trends. I call them trends. It’s funny that getting into coffee roasting, people call them curves and profiles, with just us in the industry there is trend. It’s nice to see the curves and all of that. It’s fun. It’s addicting. It really is addicting.
Brendan: Yes, I mean like any hobby I imagine so.
Kyle: Yes, wonderful.
Brendan: You mentioned that you used the Roastmaster app on your iPhone?
Kyle: Yes, I do.
Brendan: What’s that do?
Kyle: Well, I know there are some things I don’t know about it, but the app was just a few dollars I think. I think it was $25 I think to start, probably should look that up. There’s a next level that I think it’s about extra $15 roughly, so about $40 in total. I guess that’s the important part. You can do three or four different things. One of them is a few things you can just plug into the port on the iPhone, and you can get different — makes for barbecues is what they are.
You can use those. You get to set it up in app. It’s very easy, very user friendly. The GUI is great. So, let it know what its talking to, it will talk to one or two of the probes and it will just trend all of those one or two inputs.
If you want to go above and beyond that, you can use a — it’s an Arduino, I guess the brand name is Phidget. I don’t know a whole lot about it, but that’s when you start getting into real automation and writing code to do PID loop control inside the Phidget. It can through Wi-Fi talk to the Roastmaster app and have many, many inputs.
I think you can actually, maybe even give some outputs off the app, but I’m not sure. I’m still really learning the app. I thought I read that somewhere. It’s a really nice app to keep. Not only do your profiles and you’re trending, it also keep up being inventory, a lot of other stuff. Good app.
Brendan: That’s awesome. A lot of this stuff has reminded me of things that I see in home brewing. That specifically reminds me of a lot of people put temperature controls and automation on their fermentation fridge to monitor their beer tap, the ambient temperature in their fridge, and keep that at a constant temperature for when their beer fermenting. I suppose that’s very similar.
Kyle: Yes, absolutely. Every bit of it applies. You talked about who would make a great person to carry over? Then definitely, your home brewers have a lot of this and even if they don’t have a lot of parts, they have the knowledge to apply it would do a great job roasting their own coffee.
Brendan: Yes, I imagine a lot of home brewers probably do roast their own coffee already, but those who aren’t yet, would probably love to do it. I mean why not.
Kyle: Yes, exactly. Cheap, why not? Make great beer with it, absolutely.
Brendan: All right. Kyle, I’ve got to get running here. I think we could probably continue talking, but maybe we’ll do another show in the future. Any final thoughts before we wrap this up?
Kyle: I appreciate the show. I love the show. It’s great to hear some after talking all aspects of coffee, beer, and other things, sodas, Kombucha, the whole [unintelligible 00:52:07] It’s just really great. The quality of people you have on and just getting to the geeky stuff. I’ve just aid up your podcast and I just want you to know how much I appreciate you and all your guests who have been on it and share their knowledge I think it’s just a wonderful thing.
Brendan: Awesome man. I appreciate it. I know our guests will appreciate hearing that as well. If somebody wants to go find you on social media, where can they do that if they want to look up and see you’re roasting machine, or what you’re up to?
Kyle: Well, there’s two places. You can find me on Instagram @ghostlyroaster. You can also find me on YouTube at Ghostly Roaster as well. I have a bunch of videos on there that show my progress as this goes. I think I’m up to part 14 or something like that. They can go and catch it and follow me. Whenever I have a nice update, do something significant, I’ll post a video. I’m mostly on Instagram @ghostlyroaster. You can follow me there.
Brendan: Right on Kyle. I appreciate you joining me today. Glad you’re listening. Keep it up.
Kyle: Yes, I appreciate it.
Brendan: All right, take care.
Kyle: Take care. Bye-bye.
